
How to Define and Automate Material & Laminate Properties in FEMAP Using the API Environment: Guide 2024
- Daniel M.Saylor
- Jan 3, 2024
- 5 min read
Updated: Feb 2, 2024
Finite Element Analysis (FEA) is an indispensable tool for engineers and researchers. The accuracy of an FEA model is anchored in the meticulous definition of material properties. But what if you could automate this repetitive task, ensuring consistent, error-free input every time? Enter FEMAP's API with VBScript. By leveraging this guide, you won't just streamline your modeling process — you'll also gain a versatile tool. Such a program can manage multiple projects efficiently without the crutch of templates. Imagine reducing human error, saving time, and maintaining a consistent modeling methodology across different projects! Let's dive in and explore how you can elevate your FEA modeling capabilities.
To have the script file ( .BAS) used in this guide click here
Difficulty Level: Beginner
Table of Contents:
Prerequisites
Basic knowledge of FEMAP.
Familiarity with VBScript.
1. Setting Up the FEMAP API Coding Environment
1.1 Accessing the API Programming Window
Launch FEMAP
From the main menu, select Tools >Programming > API Programming
This will open the API programming window where you can input your VBScript
1.2 Recognizing the Initial API Code Lines
When you open the API Programming window, you'll notice two lines of code already present:

Dim App As femap.model: This line declares a variable named "App" as an instance of the FEMAP model. In simpler terms, it's setting up a reference that our script will use to communicate and interact with the FEMAP model environment.
Set App = feFemap(): With this line, our previously declared "App" variable is initialized or linked directly to the active FEMAP session. The feFemap() function is FEMAP's way of saying, "Hey, I want to connect to the current FEMAP model."
This connection is crucial, as it allows the subsequent script commands to create or modify data within the FEMAP environment.
2. Defining the Materials with API
Materials are the backbone of your analysis. Let's dive into defining an isotropic material named "Material_1".
2.1 Initialization
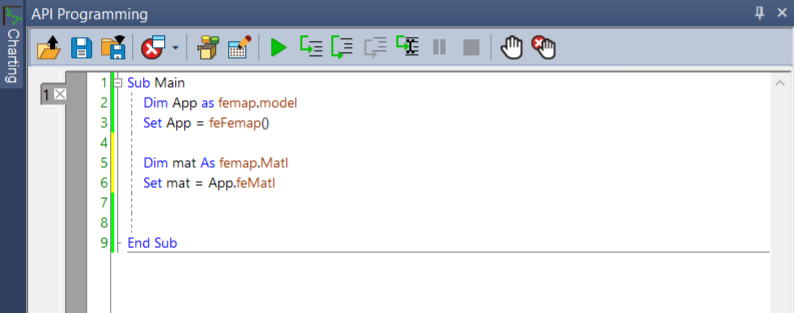
Dim mat As femap.Matl: This line declares mat as an object of type femap.Matl. This object will allow us to work with material properties in FEMAP.
Set mat = App.feMatl: Here, we are initializing the mat object to work within the current FEMAP application (represented by App).
2.2 Defining "Material_1"
The following section provides a detailed explanation of the material properties:

What it does: This sequence sets the name, type, and several mechanical properties of the material, then saves it to the FEMAP database with an ID of 1
2.2.a Setting Basic Material Details
mat.title = "Material_1"This line sets the title or name of the material to "Material_1". The .title property of the mat object allows us to specify a name for easy identification within FEMAP.
2.2.b Defining Material Type
mat.type=FMT_ISOTROPICThe material type is set to isotropic using FMT_ISOTROPIC. In material science, an isotropic material has identical properties in all directions. This means properties like Young's Modulus or Poisson's Ratio are the same in every direction.
2.2.c Specifying Material Properties
mat.Ex= 29
mat.Nuxy=0.3
mat.Gx=11.15
mat.Density=7.4999999E-11
mat.RefTemp=0
mat.Ex= 29 : Sets the Young's Modulus (often represented by E) in the x-direction to 29. This property measures the material's stiffness.
mat.Nuxy=0.3 : Specifies the Poisson's Ratio between the x and y directions. This property defines how much a material deforms in one direction when it's compressed or stretched in another.
mat.Gx=11.15: Defines the Shear Modulus (often represented by G) in the x-direction. This property measures the material's ability to deform under shear stress.
mat.Density=7.4999999E-11 : Sets the material's density. This is essential for mass-related calculations.
mat.RefTemp=0 : Specifies the reference temperature for the material, which is essential for temperature-dependent material properties.
2.2.d Saving the Material:
mat.Put(1)This line saves the defined material properties in the FEMAP database with an ID of 1. The .Put method commits the object with all its properties to the FEMAP database, making it available for further operations like meshing or analysis.
(You can similarly define other materials using the above format.)
3. Building the Composite Layer
If you're dealing with composites, defining laminate properties becomes essential. The following section demonstrates how to create a laminate named "Layup_1".

3.1 Initialization
Dim Layup As femap.Layup
Set Layup = App.feLayup
What it does: This code segment initializes the layup object to define laminate properties.
3.2 Defining "Layup_1"
Layup.Title = "Layup_1"
Layup.AddPly(1,1,0,0)
Layup.AddPly(2,4,0,0)
Layup.AddPly(3,1,0,0)
Layup.Put(1)
What it does: Here, the script defines a laminate named "Layup_1". The AddPly method adds individual plies to the laminate, specifying the material ID, thickness, orientation angle, and symmetry flag. Layup.Put(1) saves the laminate with an ID of 1.
4. Testing Your Script
After writing and understanding your script, it’s vital to test its functionality. Here's how:
Execute the Script: Run your script in the FEMAP API window by pressing the 'Run' button. If there are any errors, FEMAP will notify you. If this occurs, review the code, fix any issues, and try running the script again.
Review the FEMAP Model: After successfully running the script, check the FEMAP model tree to ensure that the materials, properties, and other elements have been added as intended. Review the properties and attributes of each item to ensure accuracy.

Debugging: If there's any unexpected behavior, use MsgBox or other debugging techniques to troubleshoot problematic areas of your code.
5. Saving the Script to a Specific Folder
Once you're confident in your script's performance:
Navigate to 'Save As' in the API programming window.
Choose a dedicated folder for your FEMAP scripts to keep them organized.
Save the script with a descriptive name, using the .bas file extension.
6. Adding the Script to FEMAP's Custom Tools Menu
To quickly access and run your script directly from FEMAP:
In FEMAP, go to 'User Tools' > 'Tools Directory'
Select the folder containing the '.BAS' file saved in step 5
Then click on 'User Tools' you will see all your '.bas' file listed
By clicking on one of them it will execute the script directly
Now, whenever you want to run this script in FEMAP, you can quickly access it directly from the 'User Tools' > 'Your ScriptName', as shown in the video Below.
Congratulations!😎 You've successfully created a script to automate the creation of materials in FEMAP, learned how to save, organize, and quickly run it from within the software. This kind of automation can be a massive time-saver, especially for repetitive tasks. Remember, the possibilities are endless with scripting – you can adapt and extend your scripts to suit any project's requirements by creating several folders for projects and saving within each folder the properties of the materials belonging to the project, streamlining your FEMAP workflows even further. Happy coding!
Get the .bas File
Interested in getting the .bas file used in this guide? Email us at support@worquick.com, and we'll send it to you in a flash. Make sure to have the subject line as "How to Define and Automate Material & Laminate Properties in FEMAP Using the API Environment: Guide" to ensure automatic delivery.
Coming Up Next
Eager to enhance your FEMAP scripting skills further? our next guide on "Defining and Automating Properties in FEMAP Using the API Environment." More insights, more automation!


Comments